Lecture 3 Activities
This lecture introduces Activities, which are the basic component used in Android applications. Activities provide a framework for the Java code that allows the user to interact with the layouts defined in the resources.
This lecture references code found at https://github.com/info448/lecture03-activities.
According to Google:
An Activity is an application component that provides a screen with which users can interact in order to do something.
You can think of an Activity as a single screen in your app, the equivalent of a “window” in a GUI system. Note that Activities don’t need to be full screens: they can also be floating modal windows, embedded inside other Activities (like half a screen), etc. But we’ll begin by thinking of them as full screens. We can have lots of Activities (screens) in an application, and they are loosely connected so we can easily move between them.
In many ways, an Activity is a “bookkeeping mechanism”: a place to hold state and data, and tell to Android what to show on the display. It functions much like a Controller (in the Model-View-Controller sense) in that regard!
Also to note from the documentation8:
An activity is a single, focused thing that the user can do.
which implies a design suggestion: Activities (screens) break up your App into “tasks”. Each Activity can represent what a user is doing at one time. If the user does something else, that should be a different Activity (and so probably a different screen).
3.1 Making Activities
We specify an Activity for an app by subclassing (extending) the framework’s Activity class. We use inheritance to make a specialized type of Activity. By extending this class, we inherit all of the methods that are needed to control how the Android OS interacts with the Activity—behaviors like showing the screen, allowing Activities to change, and closing the Activity when it is no longer being used.
If you look at the default Empty MainActivity, it actually subclasses AppCompatActivity, which is itself a already a specialized subclass of Activity that provides an ActionBar (the toolbar at the top of the screen with the name of you app). If you change the class to just extend Activity, that bar disappears.
To make this change, you will need to import the Activity class! The keyboard shortcut to import a class in Android Studio is alt+return, or you can do it by hand (look up the package in the documentation)! I recommend that you change the IDE’s preferences to automatically import classes you use.
There are a number of other built-in Activity subclasses that we could subclass instead. We’ll mention them as they become relevant. Many of the available classes have been deprecated in favor of Fragments, which are sort of like “sub-activities” that get nested in larger Activities. Fragments will be discussed in a later lecture.
3.2 The Activity Lifecycle
An important point to note: does this Activity have a constructor that we call? No! We never write code that instantiates our Activity (that is: we never call MainActivity()). There is no main() method in Android. Activities are created and managed by the Android operating system when the app is launched.
Although we never call a constructor or main() method, Activities do have an very well-defined lifecycle—that is, a series of events that occur during usage (e.g., when the Activity is created, when it is stopped, etc).
When each of these events occur, Android executes a callback method, just like how you specified the onClick() method to react to a button press. We can override these lifecycle callbacks in order to do special actions (read: run our own code) when these events occur.
What is the lifecycle?
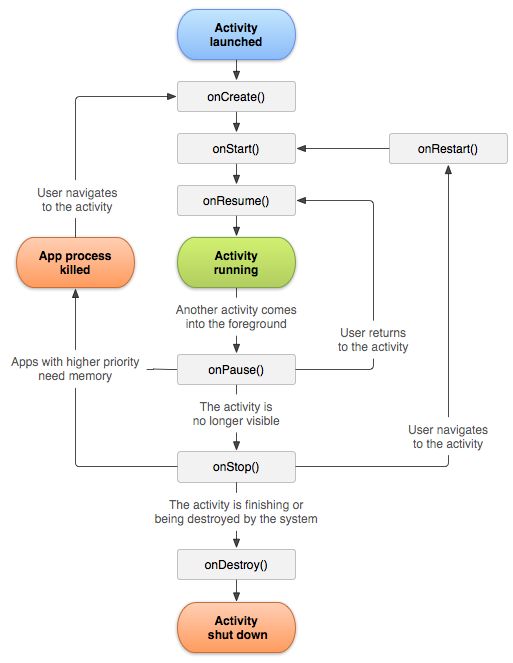
Lifecycle state diagram, from Google9. See also an alternative, simplified diagram.
There are 7 “events” that occur in the Activity Lifecycle, which are designated by the callback function that they execute:
onCreate(): called when the Activity is first created/instantiated. This is where you initialize the UI (e.g., specify which layout to use), and otherwise do the kinds of work that might go in a constructor.onStart(): called just before the Activity becomes visible to the user.The difference between
onStart()andonCreate()is thatonStart()can be called more than once (e.g., if you leave the Activity, thereby hiding it, and come back later to make it visible again).onResume(): called just before user interaction starts, indicating that the Activity is ready to be used! This is a little bit like when that Activity “has focus”.While
onStart()is called when the Activity becomes visible,onResume()is called when it is ready for interaction. It is possible for an Activity to be visible but not interactive, such as if there is a modal pop-up in front of it (partially hiding it). “onFocus” would have been a better name for this callback.onPause(): called when the system is about to start another Activity (so this one is about to lose focus). This is the “mirror” ofonResume(). When paused, the activity stays visible!This callback is usually used to quickly and temporarily store unsaved changes (like saving an email draft in memory) or stop animations or video playback. The Activity may be being closed (and so is on its way out), but could just be losing focus.
onStop(): called when the Activity is no longer visible. (e.g., another Activity took over, but also possibly because the current Activity has been destroyed). This callback is a mirror ofonStart().This callback is where you should persist any state information (e.g., saving the user’s document or game state). It is intended to do more complex “saving” work than
onPause().onRestart(): called when the Activity is coming back from a “stopped” state. This event allows you to run distinct code when the App is being “restarted”, rather than created for the first time. It is the least commonly used lifecycle callback.onDestroy(): called when the Activity is about to be closed. This can happen because the user ended the application, or (and this is important!) because the OS is trying to save memory and so kills the Activity on its own.The
onDestroy()callback can do final app cleanup, but its is considered better practice to have such functionality inonPause()oronStop(), since they are more reliably executed.Activities are also destroyed (and recreated) when the device’s configuration changes—such as if you rotate the phone!
Android apps run on devices with significant hardware constraints in terms of both memory and battery life. Thus the Android OS is very aggressive about not leaving apps running “in the background”. If it determines that an App is no longer necessary (such as because it has been hidden for a while), that app will be destroyed (shut down). Note that this destruction is unpredictable, as the “necessity” of an app being open is dependent on the OS’s resource allocation rules.
Thus in practice, you should implement Activities as if they could be destroyed at any moment—you cannot rely on them to continue running if they are not visible.Note that apps may not need to use all of these callbacks! For example, if there is no difference between starting from scratch and resuming from stop, then you don’t need an onRestart() (since onStart() goes in the middle). Similarly, onStart() may not be needed if you just use onCreate() and onResume(). But these lifecycles allow for more granularity and the ability to avoid duplicate code.
Overriding the Callback Methods
When you create an new Empty MainActivity, the onCreate() callback has already been overridden for you, since that’s where the layout is specified.
Notice that this callback takes a Bundle as a parameter. A Bundle is an object that stores key-value pairs, like a super-simple HashMap (or an Object in JavaScript, or dictionary in Python). Bundles can only hold basic types (numbers, Strings) and so are used for temporarily “bundling” small amounts of information. See before for details.
Also note that we call super.onCreate(). Always call up the inheritance chain!. This allows the system-level behavior to continue without any problem.
We can also add other callbacks: for example, onStart() (see the documentation for examples). Again, the IDE’s auto-complete feature lets you just type the name of the callback and get the whole method signature for free!
We can quickly add in the event callbacks and Log.v() calls to confirm that they are executed. Then you can use the phone to see them occur:
onCreate(),onStart()andonResume()are called when the app is instantiated.- You can
onPause()the Activity by dragging down the notification drawer from the top of the screen. - You can
onStop()the Activity by going back to the home screen (click the circle at the bottom). - You can
onDestroy()the Activity by changing the configuration and rotating the phone: click the “rotate” button on the emulator’s toolbar.
Saving and Restoring Activity State
As mentioned above, an Activity’s onCreate() method takes in a Bundle as a parameter. This Bundle is used to store information about the Activity’s current state, so that if the Activity is destroyed and recreated (e.g., when the phone is rotated), it can restored in the same state and the user won’t lose any data.
For example, the Bundle can store state information for View elements, such as what text a user has typed into an EditText. That way when the user rotates their phone, they won’t lose the form input they’ve entered! If a View has been given an android:id attribute, then that id is used to automatically save the state of that View, with no further effort needed on your own. So you should always give input Views ids!
You can also add your own custom information to the Bundle by overriding the Activity’s onSaveInstanceState() callback (use the one for AppCompactActivity that only takes one parameter). It takes as a parameter the Bundle that is being constructed with the saved data: you can add more information to this Bundle using an appropriate put() method (similar to the method used for Maps, but type-sensitive):
//java
//declare map key as a constant
private static final String MSG_KEY = "message_key";

@Override
protected void onSaveInstanceState(Bundle outState) {
    //put value "Hello World" in bundle with specified key
    outState.putString(MSG_KEY, "Hello World");
    super.onSaveInstanceState(outState);
}
//kotlin
//declare map key as a constant
private val MSG_KEY = "message_key";
override fun onSaveInstanceState(outState: Bundle) {
//put value "Hello World" in bundle with specified key
outState.putString(MSG_KEY, "Hello World");
super.onSaveInstanceState(outState);
}Note that you should always declare Bundle keys as CONSTANTS to help with readability/modifiability and to catch typos.
Be sure to always call
super.onSaveInstanceState()so that the super class can do its work to save the View hierarchy’s state! In fact, the reason that Views “automatically” save their state is because this method is calling their ownonSaveInstanceState()callback.
You can access this saved Bundle from the Activity’s onCreate() method when the Activity is recreated. Note that if the Activity is being created for the first time, then the Bundle will be null—checking for a null value is thus a good way to check if the Activity is being recreated or not:
//java
protected void onCreate(Bundle savedInstanceState) {
    super.onCreate(savedInstanceState);

    if(savedInstanceState != null){ //Activity has been recreated
        String msg = savedInstanceState.getString(MSG_KEY);
    }
    else { //Activity created for first time

    }
}
//kotlin
override fun onCreate(savedInstanceState: Bundle?) {
super.onCreate(savedInstanceState);
if(savedInstanceState != null){ //Activity has been recreated
val msg:String = savedInstanceState.getString(MSG_KEY);
}
else { //Activity created for first time
}
}Remember that a Bundle can only hold a small amount of primitive data: just a couple of numbers or Strings. For more complex data, you’ll need to use the alternative data storage solutions discussed in later lectures.
3.3 Context
If you look at the documentation for the Activity class, you’ll notice that it is itself a subclass of something called a Context10. Context is an abstract class that acts as a reference for information about the current running environment: it represents environmental data (information like “What OS is running? Is there a keyboard plugged in?”).
- You can almost think of the Context as representing the “Application”, though it’s broader than that (
Applicationis actually a subclass ofContext!)
The Context is used to do “application-level” actions: mostly working with resources (accessing and loading them), but also communicating between Activities. Effectively, it lets us refer to the state in which we are running: the “context” for our code (e.g., “where is this occurring?”). It’s a kind of reflection or meta-programming, in a way. For example, the getResources() method discussed in the last chapter is a method of the Context class, because we need to have some way of saying which set of resources to load!
There are a couple of different kinds of Contexts we might wish to refer to:
The Application context (e.g., an
Applicationobject) references the state of the entire application. It’s basically the Java object that is built out of the<application>element in the Manifest (and so contains that level of information).The Activity context (e.g., an
Activityobject) that references the state of that Activity. Again, this roughly corresponds to the Java objects created out of the<activity>elements from the Manifest.
Each of these Context objects exist for the life of its respective component: that is, an Activity Context is available as long as the Activity exists (disappearing after onDestroy()), whereas Application Contexts survive as long as the application does. We’ll almost always use the Activity context, as it’s safer and less likely to cause memory leaks.
Inside an Activity object (e.g., in a lifecycle callback function), you can refer to the current Activity using this. And since Activity is a Context, you can also use this to refer to the current Activity context. You’ll often see Context methods—like getResources()—called as undecorated methods (without an explicit this).
You’ll need to refer to the Context whenever you want to do something beyond the Activity you’re working with: whether that’s accessing resources, showing a Toast (the first parameter to Toast.makeText() is a Context), or opening another Activity.
3.4 Multiple Activities
The whole point of interfacing with the Activity Lifecycle is to handle the fact that Android applications can have multiple activities and interact with multiple other applications. In this section we’ll briefly discuss how to include multiple Activities within an app (in order to sense how the lifecycle may affect them). Note that working with multiple Activities will be discussed in more detail in a later lecture.
We can easily create a New Activity through Android Studio by using File > New > Activity. We could also just add a new .java or .kt file with the Activity class in it, but using Android Studio will also provide the onCreate() method stub as well as a layout resource.
- For practice, make a new Empty Activity called
SecondActivity. You should edit this Activity’s layout resource so that the<TextView>displays an appropriate message.
Importantly, for every Activity you make, an entry gets added to the Manifest file AndroidManifest.xml. This file acts like the “table of contents” for our application, giving information about what your app looks (that is, what Activities it has) like so that the OS can open appropriate Activities as needed. (If you create an Activity’s .java file manually, you will need to add this entry manually as well).
Activities are listed as <activity> elements nested in the <application> element. If you inspect the file you will be able to see an element representing the first MainActivity; that entry’s child elements will be discussed later.
- We can add
android:labelattributes to these<activity>elements in order to give the Activities nicer display names (e.g., in the ActionBar).
Intents
In Android, we don’t start new Activities by instantiating them (remember, we never instantiate Activities!). Instead, we send the operating system a message requesting that the Activity perform a particular action (i.e., start up and display on the screen). These messages are called Intents, and are used to communicate between app components like Activities. The Intent system allows Activities to communicate, even though they don’t have references to each other (we can’t just call a method on that other Activity).
I don’t have a good justification for the name, other than Intents announce an “intention” for the OS to do something (like start an Activity)
You can think of Intents as like letters you’d send through the mail: they are addressed to a particular target (e.g., another Activity—or more properly a Context), and contain a brief message about what to do.
An Intent is an object we can instantiate: for example, we can create a new Intent in the event handler for when we click the button on MainActivity. The Intent class has a number of different constructors, but the one we’ll start with looks like:
//java
Intent intent = new Intent(MainActivity.this, SecondActivity.class);
//kotlin
val intent = Intent(this@MainActivity, SecondActivity::class.java)The first parameter is the Context by which this Intent will be delivered (e.g., this). Note that we use the fully qualified this@MainActivity to indicate that we’re not talking about the anonymous event handler class.
The second parameter to this constructor is the Class we want to send the Intent to (the ::class refers to the class variable defined in SecondActivity, and the .java property gets the Java class reference that Android expects; this is metaprogramming!). Effectively, it is the “address” on the envelop for the message we’re sending.
After having instantiated the Intent, we can use that message to start an Activity by calling the startActivity() method (inherited from Activity), and passing it the Intent:
startActivity(intent);This method will “send” the message to the operating system, which will deliver the Intent to the appropriate Activity, telling that Activity to start as soon as it receives the message.
With this interaction in place, we can now click a button to start a second activity, (and see how that impacts our lifecycle callbacks).
- And we can use the back button to go backwards!
There are actually a couple of different kinds of Intents (this is an Explicit Intent, because it is explicit about what Activity it’s sent to), and a lot more we can do with them. We’ll dive into Intents in more detail in a later lecture; for now we’re going to focus on mostly Single Activities.
- For example, if you look back at the Manifest, you can see that the
MainActivityhas an<intent-filter>child element that allows it to receive particular kinds of Intents—including ones for when an App is launched for the first time!
Back & Tasks
We’ve shown that we can have lots of Activities (and of course many more can exist across multiple apps), and we are able to move between them by sending Intents and clicking the “Back” button. But how exactly is that “Back” button able to keep track of where to go to?
The abstract data type normally associated with “back” or “undo” functionality is a stack, and that is exactly what Android uses. Every time you start a new Activity, Android instantiates that object and puts it on the top of a stack. Then when you hit the back button, that activity is “popped” off the stack and you’re taken to the Activity that is now at the top.
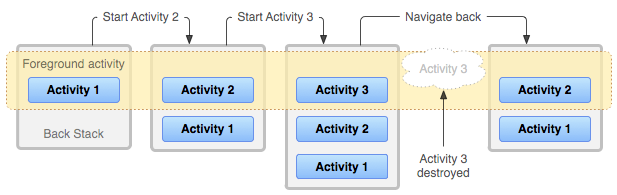
An example of the Activity stack, from Google11.
However, you might have different “sequences” of actions you’re working on: maybe you start writing an email, and then go to check your Twitter feed through a different set of Activities. Android breaks up these sequences into groups called Tasks. A Task is a collection of Activities arranged in a Stack, and there can be multiple Tasks in the background of your device.
Tasks usually start from the Android “Home Screen”—then launching an application starts a new Task. Starting new Activities from that application will add them to the Stack of the Task. If you go back to the Home Screen, the Task you’re currently on is moved to the background, so the “back” button won’t let you navigate that Stack.
It’s useful to think of Tasks as being like different tabs in a web browser, with the “back stack” being the history of web pages visited within that tab.
As a demonstration, try switching to another (built-in) app and then back to the example app; how does the back button work in each situation?
An important caveat: Tasks are distinct from one another, so you can have different copies of the same Activity on multiple stacks (e.g., the Camera activity could be part of both Facebook and Twitter app Tasks if you are on a selfie binge). It is possible to modify this behavior though, see Managing Tasks