Lecture 1 Introduction
This course focuses on Android Development. But what is Android?
Android is an operating system. That is, it’s software that connects hardware to software and provides general services. But more than that, it’s a mobile specific operating system: an OS designed to work on mobile (read: handheld, wearable, carry-able) devices.
Note that the term “Android” also is used to refer to the “platform” (e.g., devices that use the OS) as well as the ecosystem that surrounds it. This includes the device manufacturers who use the platform, and the applications that can be built and run on this platform. So “Android Development” technically means developing applications that run on the specific OS, it also gets generalized to refer to developing any kind of software that interacts with the platform.
1.1 Android History
If you’re going to develop systems for Android, it’s good to have some familiarity with the platform and its history, if only to give you perspective on how and why the framework is designed the way it is:
2003: The platform was originally founded by a start-up “Android Inc.” which aimed to build a mobile OS operating system (similar to what Nokia’s Symbian was doing at the time)
2005: Android was acquired by Google, who was looking to get into mobile
2007: Google announces the Open Handset Alliance, a group of tech companies working together to develop “open standards” for mobile platforms. Members included phone manufacturers like HTC, Samsung, and Sony; mobile carriers like T-Mobile, Sprint, and NTT DoCoMo; hardware manufacturers like Broadcom and Nvidia; and others. The Open Handset Alliance now (2017) includes 86 companies.
Note this is the same year the first iPhone came out!
2008: First Android device is released: the HTC Dream (a.k.a. T-Mobile G1)
Specs: 528Mhz ARM chip; 256MB memory; 320x480 resolution capacitive touch; slide-out keyboard! Author’s opinion: a fun little device.
2010: First Nexus device is released: the Nexus One. These are Google-developed “flagship” devices, intended to show off the capabilities of the platform.
Specs: 1Ghz Scorpion; 512MB memory; .37" at 480x800 AMOLED capacitive touch. For comparison, the iPhone 8 Plus (2017) has: ~2.54Ghz hex-core A11 Bionic 64bit; 3GB RAM; 5.5" at 1920x1080 display.
(As of 2016, this program has been superseded by the Pixel range of devices).
2014: Android Wear, a version of Android for wearable devices (watches) is announced.
2016: Daydream, a virtual reality (VR) platform for Android is announced.
In short, Google keeps pushing the platform wider so it includes more and more capabilities.
Android is incredibly popular! (see e.g., here, here, and here)
- In any of these analyses there are some questions about what exactly is counted… but what we care about is that there are a lot of Android devices out there! And more than that: there are a lot of different devices!
Android Versions
Android has gone through a large number of “versions” since it’s release:
| Date | Version | Nickname | API Level |
|---|---|---|---|
| Sep 2008 | 1.0 | Android | 1 |
| Apr 2009 | 1.5 | Cupcake | 3 |
| Sep 2009 | 1.6 | Donut | 4 |
| Oct 2009 | 2.0 | Eclair | 5 |
| May 2010 | 2.2 | Froyo | 8 |
| Dec 2010 | 2.3 | Gingerbread | 9 |
| Feb 2011 | 3.0 | Honeycomb | 11 |
| Oct 2011 | 4.0 | Ice Cream Sandwich | 14 |
| July 2012 | 4.1 | Jelly Bean | 16 |
| Oct 2013 | 4.4 | KitKat | 19 |
| Nov 2014 | 5.0 | Lollipop | 21 |
| Oct 2015 | 6.0 | Marshmallow | 23 |
| Aug 2016 | 7.0 | Nougat | 24 |
| Aug 2017 | 8.0 | Oreo | 26 |
| Aug 2018 | 9.0 | Pie | 28 |
Each different “version” is nicknamed after a dessert, in alphabetical order. But as developers, what we care about is the API Level, which indicates what different programming interfaces (classes and methods) are available to use.
- You can check out an interactive version of the history through Marshmallow at https://www.android.com/history/
- For current usage breakdown, see https://developer.android.com/about/dashboards/
Additionally, Android is an “open source” project released through the “Android Open Source Project”, or ASOP. You can find the latest version of the operating system code at https://source.android.com/; it is very worthwhile to actually dig around in the source code sometimes!
While new versions are released fairly often, this doesn’t mean that all or even many devices update to the latest version. Instead, users get updated phones historically by purchasing new devices (every 18m on average in US). Beyond that, updates—including security updates—have to come through the mobile carriers, meaning that most devices are never updated beyond the version that they are purchases with.
This is a problem from a consumer perspective, particularly in terms of security! There are some efforts on Google’s part to to work around this limitation by moving more and more platform services out of the base operating system into a separate “App” called Google Play Services, as well as to divorce the OS from hardware requirements through the new Project Treble.
But what this means for developers is that you can’t expect devices to be running the latest version of the operating system—the range of versions you need to support is much greater than even web development! Android applications must be written for heterogeneous devices.
Legal Battles
When discussing Android history, we would be remiss if we didn’t mention some of the legal battles surrounding Android. The biggest of these is Oracle v Google. In a nutshell, Oracle claims that the Java API is copyrighted (that the method signatures themselves and how they work are protected), so because Google uses that API in Android, Google is violating the copyright. In 2012 a California federal judge decided in Google favor (that one can’t copyright an API). This was then reversed by the Federal Circuit court in 2014. The verdict was appealed to the US Supreme Court in 2015, who refused to hear the case. It then went back to the the district court, which ruled in 2016 that Google’s use of the API was fair use. This ruling is again under appeal. See https://www.eff.org/cases/oracle-v-google for a summary, as well as https://arstechnica.com/series/series-oracle-v-google/
- One interesting side effect of this battle: the Android Nougat and later uses the OpenJDK implementation of Java, instead of Google’s own in-violation-but-fair-use implementation see here. This change shouldn’t have any impact on you as a developer, but it’s worth keeping an eye out for potentially differences between Android and Java SE. This may also be a motivator for Android to make Kotlin its primary language.
There have been other legal challenges as well. While not directly about Android, the other major relevant court battle is Apple v Samsung. In this case, Apple claims that Samsung infringed on their intellectual property (their design patents). This has gone back and forth in terms of damages and what is considered infringing; as of this writing, the latest development is that the Supreme Court heard the case and sided with Samsung that infringing design patents shouldn’t lead to damages in terms of the entire device… it’s complicated (the author is not a lawyer).
So overall: Android is a growing, evolving platform that is embedded in and affecting the social infrastructures around information technology in numerous ways.
1.2 Building Apps
While Android applications can be developed using any programming environment, the official and best IDE for Android programming is Android Studio. This is a fork of JetBrain’s IntelliJ IDEA application—a Java IDE customized for Android development. You will need to download and install this IDE.
Be sure to download the Android Studio bundle that includes the Android SDK (Standard Development Kit): the tools and libraries needed for Android development. In particular, the SDK comes with a number of useful command line tools. These include:
adb, the “Android Device Bridge”, which is a connection between your computer and the device (physical or virtual). This tool is used for console output!emulator, which runs the Android emulator: a virtual machine of an Android device.
I recommend making sure that you have the SDK tools (the
toolsandplatform-toolsfolder) available on your computer’sPATHso you can use them from the command line. By default, the SDK is found at/Users/$USER/Library/Android/sdkon a Mac, and atC:\Users\$USERNAME\AppData\Local\Android\sdkon Windows. While these tools are all built into the IDE, they can be useful fallbacks for debugging or automation.
Creating a Project
To begin your first application, launch Android Studio (it may take a few minutes to open). From the Welcome screen, choose to “Start a new Android Studio Project”. This will open up a wizard to walk you through setting up the project.
The “Company domain” should be a unique domain for you. For this course, you should include your UW NetID, e.g.,
joelross.uw.edu.Make a mental note of the project location so you can find your work later (e.g., if it’s in
DesktoporDocuments).If you choose to “Include Kotlin Support”, the application will be created with Kotlin rather han Java. Since we haven’t learned Kotlin yet, we’ll start with a Java example so the little code we look at is more familiar.
On the next screen, you will need to pick the Minimum SDK level that you wish to support—that is, what is the oldest version of Android your application will be able to run on? For this course, unless otherwise specified, you should target API 19 KitKat (4.4) as a minimum, allowing your application to run on pretty much any Android device.
Note that the Minimum SDK is different than the Target SDK, which is the version of Android your application has been tested and designed against. The Target SDK indicates what set of API features you have considered/coded against, even if your app can fall back to older devices that don’t include those features. In many ways, the Target SDK is the “highest SDK I’ve worked with”. For most of this course we will target API 24 (Nougat).
On the next screen, select to start with an Empty Activity. Activities are the basic component of Android, each of which acts as a “screen” or “page” in your app. Activities are discussed in more detail in the next lecture.
Stick with the default name (
MainActivity) on the next screen, and hit “Finish”. Android Studio will take a few minutes to create your project and get everything set up. (Keep an eye on the bottom status bar to wait for everything to be finished). Once it is done, you have a complete (if simple) app!
Running the App
You can run your app by clicking the “Play” or “Run” button at the top of the IDE. But you’ll need an Android Device to run the app on… luckily, Android Studio comes with one: a virtual Android Emulator. This virtual machine models emulates a generic device with hardware you can specify, though it does have some limitations (e.g., no cellular service, no bluetooth, etc).
While it has improved recently, the emulator historically does not work very well on Windows—it runs very slowly (though it is improving!). The best way to speed the emulator up on any operating system is to make sure you have enabled HAXM (Intel’s Acceleration Manager which allows the emulator to utilize your GPU for rendering): this speeds things up considerably.
You can usually install this through Android Studio: go to
Tools > Android > SDK Managerto open up the SDK manager for downloading different versions of the Android SDK and other support software. Under “SDK Tools”, find “Intel x86 Emulator Accelerator (HAXM installer)”, check it, and hit “OK” to download. Note that you may need to do additional installation/configuration manually, see the guides (Mac, Windows).It is of course also possible to run your app on a physical device. These are the best for development (they are the fastest, easiest way to test code), though you’ll need a USB cable to be able to wire your device to your computer. Any device will work for this course; you don’t even need cellular service (just WiFi should work).
You will need to turn on developer options in order to install development apps on your device!
In order to create an emulator for your machine, go to Tools > Android > AVD Manager to open up the Android Virtual Device Manager. You can then choose “Create Virtual Device…” in order to launch the wizard to specify a new emulator.
The Pixel 2 is a good choice of hardware profile. The Nexus 5X is also reasonable for an “older” device.
For now, you’ll want to use a system image for Nougat API 24, and almost certainly on x86 (Intel) hardware. Make sure to select one that includes the Google APIs (so you have access to special Google libraries).
The advanced settings can be used to specify things like the camera and whether it accepts keyboard input (should be on by default). These settings can always be changed later.
After the emulator boots, you can slide to unlock it… and your app should be loaded and started shortly thereafter!
Note that if you are unfamiliar with Android devices, you should be sure to play around with the interface to get used to the interaction language, e.g., how to click/swipe/drag/long-click elements to use an app.
1.3 App Source Code
Android Studio will create a bunch of project files by default—almost all of which are use for something. By default, it will show your project using the Android view, which organizes the files thematically. If you instead change to the Project view you can see what the actual file system looks like (though we’ll usually stick with the Android view).
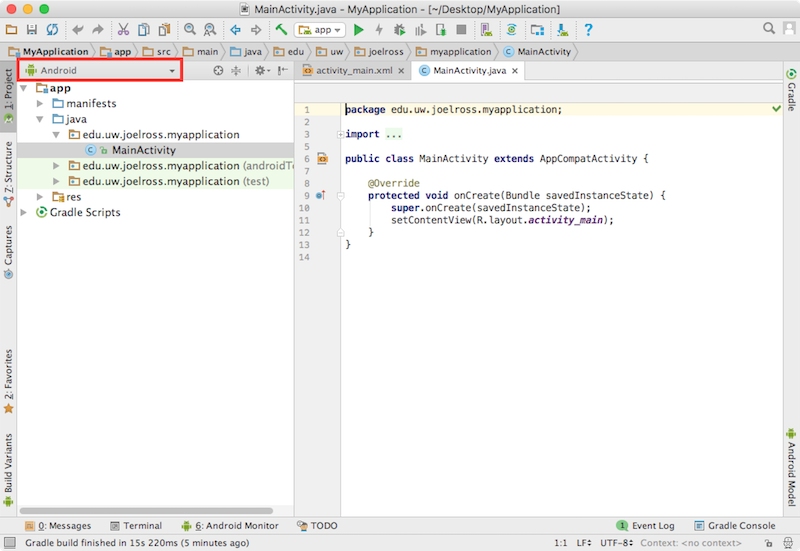
Android Studio. The “view” chooser is marked in red.
In the Android view, files are organized as follows:
app/folder contains our application source codemanifests/contains the Android Manifest files, which is sort of like a “config” file for the appjava/contains the Java source code for your project. This is where the “logic” of the application goes. (This is still calledjava/even if it contains Kotlin code!)res/contains XML resource files used in the app. This is where we will put layout/appearance information
Gradle Scriptscontains scripts for the Gradle build tool, which is used to help compile the source code for installation on an device.
Each of these components will be discussed in more detail below.
XML Resources
The res/ folder contains resource files. Resource files are used to define the user interface and other media assets (images, etc). for the application. Using separate files to define the application’s interface than those used for the application’s logic (the Java code) helps keep appearance and behavior separated. To compare to web programming: the resources contain the HTML/CSS content, while the Java code will contain what would normally by written in JavaScript.
The vast majority of resource files are specified in XML (EXtensible Markup Language). XML has the exact same syntax as HTML, but you get to make up your own tags what whatever semantic values you want. Except we’ll be using the tags that Android made up and provided: so defining an Android application interface will be a lot like defining a web page, but with a new set of elements. Note that this course expects you to have some familiarity with HTML or XML, but if not you should be able to infer the syntactical structure from the examples.
There are a large number of different kinds of resources, which are organized into different folders:
res/drawable/: contains graphics (PNG, JPEG, etc) that will be “drawn” on the screenres/layout/: contains user interface XML layout files for the app’s contentres/mipmap/: contains launcher icon files in different resolutions to support different devicesres/values/: contains XML definitions for general constants
There are other kinds of resources as well: see Available Resources or Resources and Layouts for details.
The most common resource you’ll work out are the layout resources, which are XML files that specify the visual layout of the component (like the HTML for a web page).
If you open a layout file (e.g., activity_main.xml) in Android Studio, by default it will be shown in a “Design” view. This view lets you use a graphical system to lay out your application, similar to what you might do with a PowerPoint slide. Click the “Text” tab at the bottom to switch to the XML code view.
- Using the design view is frowned upon by many developers for historical resources, even as it becomes more powerful with successive versions of Android Studio. It’s often cleaner and more effective to write out the layouts and content in direct XML code. This is sort of the same difference between writing your own HTML and using something like DreamWeaver or Wix to create a page. While those are legitimate applications, they are seen as less “professional”. This course will focus on the XML code for creating layouts, rather than utilizing the design tool. See here for more on its features.
In the code view, you can see the XML: tags, attributes, values. Elements are nested inside one another. The provided XML code defines a layout (a <android.support.constraint.ConstraintLayout>) to organize things, and inside that is a <TextView> (a View representing some text).
- Note that most of the element attributes are namespaced, e.g. with an
android:prefix, to avoid any potential conflicts (so we know we’re talking about Android’stextinstead of something else).
The android:text attribute of the <TextView> contains some text. You can change that and re-run the app to see it update!
You will be able to specify what your app looks like by creating these XML layout files. For example, try replacing the <TextView> with a <Button>:
<Button
     android:id="@+id/my_button"
     android:layout_width="wrap_content"
     android:layout_height="wrap_content"
     android:text="Click Me!"
     />
This XML defines a Button. The android:text attribute in this case specifies what text is shown on the button. Resources and Layouts will describe in more detail the meaning of the other attributes, but you should be able to make a pretty good educated guess based on the names.
- (You can keep the
app:scoped attributes if you want the button to stay in the center of the screen. Positioning will be discussed in Resources and Layouts).
The Manifest
Besides resource files, the other XML you may need to edit is the Manifest File AndroidManifest.xml, found in the manifest/ folder in the Android project view. The Manifest acts like a “configuration” file for the application, specifying application-level details such as the app’s name, icon, and permissions.
For example, you can change the displayed name of the app by modifying the android:label attribute of the <application> element. By default, the label is a reference to another resource found in the res/values/strings.xml file, which contains definitions for string “constants”. Ideally all user-facing strings—including things like button text—should be defined as these constants.
You will usually need to make at least one change to the Manifest for each app (e.g., tweaking the display name), so you should be familiar with it.
Java Activities
Besides using XML for specifying layouts, Android applications are written in Java, with the source code found in the java/ folder in the Android project view (in a nested folder structure based on your app’s package name). The Java code handles program control and logic, as well as data storage and manipulation.
Writing Android code will feel a lot writing any other Java program: you create classes, define methods, instantiate objects, and call methods on those objects. But because you’re working within a framework, there is a set of code that already exists to call specific methods. As a developer, your task will be to fill in what these methods do in order to run your specific application.
In web terms, this is closer to working with Angular (a framework) than jQuery (a library).
Writing in Kotlin instead of Java just means you use different syntax to produce basically the same code and logic.
So while you can and will implement “normal” Java classes and models in your code, you will most frequently be utilizing a specific set of classes required by the framework, giving Android applications a common structure.
The most basic component in an Android program is an Activity, which represents a single screen in the app (see Activities for more details). The default provided MainActivity class is an example of this: the class extends Activity (actually it extends a subclass that supports Material Design components), allowing you to make your own customizations to the app’s behavior within the Android framework.
In this class, we override the inherited onCreate() method that is called by the framework when the Activity starts—this method thus acts a little bit like the constructor for a class (though see Activities for a more nuanced discussion).
We call the super method to make sure the framework does it stuff, and then setContentView() to specify what the content (appearance) of the Activity should be. This is passed in a value from something called R. R is a class that is generated at compile time and contains constants that are defined by the XML “resource” files! Those files are converted into Java variables, which we can access through the R class. Thus R.layout.activity_main refers to the activity_main layout found in the res/layouts/ folder. That is how Android knows what layout file to show on the screen.
Dalvik
On a desktop, Java code needs to be compiled into bytecode and runs on a virtual machine (the Java Virtual Machine (JVM)). Pre-Lollipop (5.0), Android code ran on a a virtual machine called Dalvik.
- Fun fact for people with a Computer Science background: Dalvik uses a register-based architecture rather than a stack-based one!
A developer would write Java code, which would then be compiled into JVM bytecode, which would then be translated into DVM (Dalvik Virtual Machine) bytecode, that could be run on Android devices. This DVM bytecode is stored in .dex or .odex (“[Optimized] Dalvik Executable”) files, which is what was loaded onto the device. The process of converting from Java code to dex files is called “dexing” (so code that has been compiled and converted is called “dexed”).
Dalvik does include JIT (“Just In Time”) compilation to native code that runs much faster than the code interpreted by the virtual machine, similar to the Java HotSpot. This native code is faster because no translation step is needed to talk to the actual hardware (via the OS).
However, from Lollipop (5.0) on, Android instead uses Android Runtime (ART) to run code. ART’s biggest benefit is that it compiles the .dex bytecode into native code at installation using AOT (“Ahead of Time”) compilation. ART continues to accept .dex bytecode for backwards compatibility (so the same dexing process occurs), but the code that is actually installed and run on a device is native. This allows for applications to have faster execution, but at the cost of longer install times—and since you only install an application once, this is a pretty good trade.
(Kotlin also is compiled into .dex bytecode, so it ends up in the same place as Java).
After being built, an Android application (the source, dexed bytecode, and any non-code resources such as images) are packaged into an .apk file. This are basically zip files (it uses the same gzip compression); if you rename the file to be .zip and you can uncompress it! The .apk file is then cryptographically signed to specify its authenticity, and either “side-loaded” onto the device or uploaded to an App Store for deployment.
In short: the signed
.apkfile is basically the “executable” version of your program!Google is in the process of deprecating
.apkfiles and replacing them with Android App Bundles. These contain all of the compiled source code, but offloads APK generation and app signing to the Play Store.Note that the Android application framework code (e.g., the base
Activityclass) is actually “pre-DEXed” (pre-compiled) on the device; when you write code, you’re compiling against empty code stubs (rather than needing to include those classes in your.apk)! That said, any other 3rd-party libraries you include will be copied into your built app, which can increase its file size both for installation and on the device.Usefully, since Android code is written for a virtual machine anyway, Android apps can be developed and built on any computer’s operating system (unlike some other mobile OS…).
Gradle Scripts
To summarize, after writing your Java and XML source code, in order to “build” and run your app you need to:
- Generate Java source files (e.g.,
R) from the XML resource files - Compile the Java (or Kotlin) code into JVM bytecode
- “dex” the JVM bytecode into Dalvik bytecode
- Pack code and other assets into an
.apk - Cryptographically sign the
.apkfile to authorize it - Transfer the
.apkto your device, install, and run it!
This is a lot of steps! Luckily the IDE handles it for us using an automated build tool called Gradle. Such tools let you, in effect, specify a single command that will do all of these steps at once.
It is possible to customize the build script by modifying the Gradle script files, found in the Gradle Scripts folder in the Android project view. There are a lot of these by default:
build.gradle: Top-level Gradle build; project-level (for building!)app/build.gradle: Gradle build specific to the app. Use this one to customize your project!, such as for adding dependencies or external libraries.- For example, we can change the Target SDK in here.
proguard-rules.pro: config for release version (minimization, obfuscation, etc).gradle.properties: Gradle-specific build settings, sharedlocal.properties: settings local to this machine onlysettings.gradle: Gradle-specific build settings, shared
Note that older Android applications were developed using Apache ANT. The build script was stored in the build.xml file, with build.properties and local.properties containing global and local build settings. While Gradle is more common these days, you should be aware of ANT for legacy purposes.
It is also possible to use Gradle to build and install your app from the command line if you want. You’ll need to make sure that you have a device (either physical or virtual) connected and running. Then from inside the project folder, you can build and install your app with
# use the provided Gradle wrapper to run the `installDebug` script
./gradlew installDebug
You can also launch the app from the command-line with the command
# use adb to start
adb shell am start -n package.name/.ActivityName&& (which short-circuits, so it will only launch if the build was successful).
1.4 Logging & ADB
In Android, we can’t use System.out.println() because we don’t actually have a console to print to! More specifically, the device (which is where the application is running) doesn’t have access to standard out (stdout), which is what Java means by System.out.
- It is possible to get access to
stdoutwithadbusingadb shell stop; adb shell setprop log.redirect-stdio true; adb shell start, but this is definitely not ideal.
Instead, Android provides a Logging system that we can use to write out debugging information, and which is automatically accessible over the adb (Android Debugging Bridge). Logged messages can be filtered, categorized, sorted, etc. Logging can also be disabled in production builds for performance reasons (though it often isn’t, because people make mistakes).
To perform this logging, we’ll use the android.util.Log1 class. This class includes a number of static methods, which all basically wrap around println to print to the device’s log file, which is then accessible through the adb.
You will need to
importtheLogclass!You can have Android Studio automatically add the
importfor a class by selecting that class name and hittingalt-return(you will be prompted if the class name is ambiguous). For better results, turn on “Add unambiguous imports on the fly” in the IDE Preferences.
The device’s log file is stored persistently… sort of. It’s a 16k file, but it is shared across the entire system. Since every single app and piece of the system writes to it, it fills up fast. Hence filtering/searching becomes important, and you tend to watch the log (and debug your app) in real time!
Log Methods
Log provides methods that correspond to different level of priority (importance) of the messages being recorded. From low to high priority:
Log.v(): VERBOSE output. This is the most detailed, for everyday messages. This is often the go-to, default level for logging. Ideally,Log.v()calls should only be compiled into an application during development, and removed for production versions.Log.d(): DEBUG output. This is intended for lower-level, less detailed messages (but still code-level, that is referring to specific programming messages). These messages can be compiled into the code but are removed at runtime in production builds through Gradle.Log.i(): INFO output. This is intended for “high-level” information, such at the user level (rather than specifics about code).Log.w(): WARN output. For warningsLog.e(): ERROR output. For errors- Also if you look at the API…
Log.wtf()!
These different levels are used to help “filter out the noise”. So you can look just at errors, at errors and warnings, at error, warn, and info… all the way down to seeing everything with verbose. A huge amount of information is logged, so filtering really helps!
Each Log method takes two Strings as parameters. The second is the message to print. The first is a “tag”—a String that’s prepended to the output which you can search and filter on. This tag is usually the App or Class name (e.g., “AndroidDemo”, “MainActivity”). A common practice is to declare a TAG constant you can use throughout the class:
private static final String TAG = "MainActivity";Logcat
You can view the logs via adb (the debugging bridge) and a service called Logcat (from “log” and “conCATenation”, since it concatenates the logs). The easiest way to check Logcat is to use Android Studio. The Logcat browser panel is usually found at the bottom of the screen after you launch an application. It “tails” the log, showing the latest output as it appears.
You can use the dropdown box to filter by priority, and the search box to search (e.g., by tag if you want). Android Studio also lets you filter to only show the current application, which is hugely awesome. Note that you may see a lot of Logs that you didn’t produce, including possibly Warnings (e.g., I see a lot of stuff about how OpenGL connects to the graphics card). This is normal!
It is also possible to view Logcat through the command line using adb, and includes complex filtering arguments. See Logcat Command-line Tool for more details.
- Something else to test: Cause the app to throw a runtime
Exception! For example, you could make a new local array and try to access an item out of bounds. Or justthrow new RuntimeException()(which is slightly less interesting). Can you see the Stack Trace in the logs?
Logging is fantastic and a great techniques for debugging, both in how Activities are being used or for any kind of bug (also RuntimeExceptions). It harkens back to printline debugging, which is still a legitimate debugging process thank you very much.
Note that Android Studio does have a built-in debugger if you’re comfortable with such systems. We’ll talk about this more during a future lab.
Toast
Logs are great for debugging output, but remember that they are only visible for developers (you need to have your phone plugged into the IDE or SDK!) If you want to produce an error or warning message for the user, you need to use a different technique.
One simple, quick way of giving some short visual feedback is to use what is called a Toast. This is a tiny little text box that pops up at the bottom of the screen for a moment to quickly display a message.
- It’s called a “Toast” because it pops up!
Toasts are pretty simple to implement, as with the following example (from the official documentation):
Toast toast = Toast.makeText(this, "Hello toast!", Toast.LENGTH_SHORT);
toast.show();

//as one line. Don't forget to show()!
Toast.makeText(this, "Hello toast!", Toast.LENGTH_SHORT).show();
Toasts are created by using the Toast.makeText() factory method (instead of calling a constructor). This method takes three parameters: the Context, or what is producing the Toast (see Chapter 3), the text to display, and an int constant representing the length the Toast should appear.
Toasts are intended to be a way to provide information to the user (e.g., giving them quick feedback), but they can possibly be useful for testing too (though in the end, Logcat is going to be your best bet for debugging, especially when trying to solve crashes or see more complex output).
1.5 Adding Interaction
Finally, we’ve created a button and discussed how to show visual information to the user… so let’s hook those together!
As with JavaScript, in order to have our button do something, we need to register a callback function that can be executed when the button is clicked. In Java, these callback functions are supplied by “listener” objects who can respond to events (see Appendix B for a more detailed discussion).
First, we need to get access to a variable that represents the Button we defined in the XML—similar to what you do with document.getElementById() in JavaScript. The method to access an element in Android is called findViewById(), and can be called directly on the Activity:
Button button = (Button)findViewById(R.id.my_button);As an argument, we pass in a value defined in the auto-generated R class that represents the button’s id value—this is based on what we put in the <Button>’s android:id attribute. The exact format is discussed in Resources and Layouts.
- Note that the method returns a
View(a superclass ofButton), so we almost always typecast the result. See Resources and Layouts for more on theViewclass.
We can then register a listener (callback) by calling the setOnClickListener() method and passing in an anonymous class to act as the listener:
button.setOnClickListener(new View.OnClickListener() {
   public void onClick(View v) {
        // Perform action on click
   }
});
Tab completion is your friend!! Try just typing the button., and then selecting the method name from the provided list. Similarly, you can begin to type new OnClick and then tab-complete the rest of the class definition. The Android Studio IDE makes this ubiquitous boilerplate code easy to produce.
Finally, we can fill in the method to have it log out or toast something when clicked!
1.6 Kotlin
As mentioned above, Android Studio now provides the ability to write the “logic” for your applications in Kotlin rather than Java. Kotlin is discussed in more detail in a later lecture, but this section will give you a quick taste of how to use Kotlin in an Android application.
There are two ways to include Kotlin in your Android application:
You can use Kotlin when you first create a project in Android Studio by clicking the “Include Kotlin Support” option. This will cause your initial activity to become a Kotlin file (e.g.,
MainActivity.kt) instead of a Java file.It is also possible to use Android Studio to convert a Java file into a Kotlin file! To do this, you can use the
Code > Convert Java File to Kotlin Filecommand from the main menu, or invoke a Find Action withshift-cmd-a. This will cause Android Studio to refactor your Java code into Kotlin code, replacing all of the Java Syntax with Kotlin syntax.
You’ll notice that most of the code looks the same—some punctuation has moved around and a few words are missing, but otherwise it’s the same setup. The specific differences and details of the language are discussed in the Kotlin lecture.