Lecture 13 Threads and Services
This lecture discusses a component of Android development that is not immediately visible to users: Services40. Services are sort of like Activities that don’t have a user interface or user interaction directly tied to them. Services can be launched by Activities or Applications, but then do their own thing in the background even after the starting component is closed. Once a Service is started, it keeps running until it is explicitly stopped (Services can be destroyed by the OS to save memory, similar to an Activity, but Services have higher “priority” and so aren’t killed as readily).
Some common uses for a Service include:
- Downloading or uploading data from/to a network in the background even if the app is closed
- Saving data to a database without crashing if the user leaves the app
- Running some other kind of long-running, “background” task even after the app is closed, such as playing music!
The most common use of Services is to regularly perform a background task in a way that doesn’t block the main UI interaction. This lecture thus begins with a discussion of threads and processes in Android, before detailing how to implement a Service.
This lecture references code found at https://github.com/info448/lecture13-services.
13.1 Threads and Processes
Concurrency is the process by which we have multiple processes (think: methods) running at the same time. This can be contrasted with processes that run serially, or one after another.
For example, if you call two methods one after the other, then the second method execute will “wait” for the first one to finished:
//java
public void countUp() {
    for(int i=0; i<1000; i++){
        System.out.println(i);
    }
}

public void countDown() {
    for(int i=0; i> -1000; i--){
        System.out.println(i);
    }
}

countUp(); //start counting up
countDown(); //start counting down (once finished going up)
Computers as a general rule do exactly one thing a time: your central processing unit (CPU) just adds two number together over and over again, billions of times a second
- The standard measure for rate (how many times per second) is the
hertz(Hz). So a 2 gigahertz (GHz) processor can do 2 billion operations per second.
However, we don’t realize that computers do only one thing at a time! This is because computers are really good at multitasking: they will do a tiny bit of one task, and then jump over to another task and do a little of that, and then jump over to another task and do a little of that, and then back to the first task, and so on.
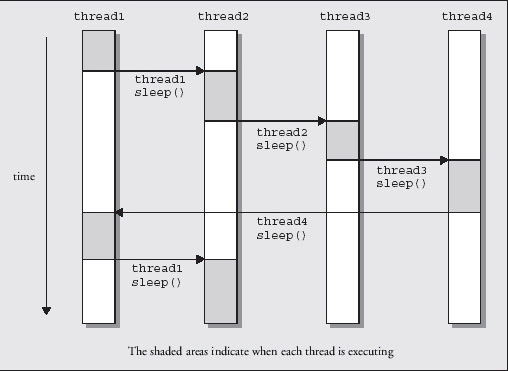
Diagram of thread switching (source unknown)
These “tasks” are divided up into two types: processes and threads. Read this brief summary of the difference between them.
By breaking up a program into threads (which are “interwoven”), we can in effect cause the computer to do two tasks at once. This is especially useful if one of the “tasks” might take a really long time—rather than blocking the application, we can let other tasks also make some progress while we’re waiting for the long task to finish.
Java Threads
In Java, we create a Thread by creating a class that implements the Runnable interface. This represents a class that can be “run” in a separate thread! The run() method required by the interface acts a bit like the “main” method for that Thread: when we start the Thread running, that is the method that will get called.
If we just instantiate the Runnable() and call its run() method, that won’t actually execute the method on a different thread (remember: an interface is just a “sign”; we could have called the interface and method whatever we wanted and it would still compile). Instead, we execute code on a separate thread by using an instance of the Thread class. This class actually does the work of running code on a separate thread.
Thread has a constructor that takes in a Runnable instance as a parameter—you pass an object representing the “code to run” to the Thread object (this is an example of the Strategy Pattern). You then can actually start the Thread by calling its .start() method (not the run method!).
- Anonymous variables will be useful here; you don’t need to assign a variable name to the
Runnableobjects or even theThreadobjects if you just use them directly.
For example, making the above countUp() and countDown() methods run on separate threads can cause the the output to be “interwoven”, showing some positive then some negative numbers (you may need to increase the count or slow down the operation to see it in action, so one thread doesn’t finish before the “switch”).
Android Threads
Android apps run by default on the Main Thread (also called the UI Thread). This thread is in charge of all user interactions—handling button presses, scrolls, drags, etc.—but also UI output like drawing and displaying text! See Android Threads for more details.
- As mentioned above, a thread is a piece of a program that is independently scheduled by the processor. Computers do exactly one thing at a time, but make it look like they are doing lots of tasks simultaneously by switching between them (i.e., between processes) really fast. Threads are a way that we can break up a single application or process into little “sub-process” that can be run simultaneously—by switching back and forth periodically so everyone has a chance to work
Within a single thread, all method calls are synchronous—that is, one has to finish before the next occurs. You can’t get to step 4 without finishing step 3. With an event-driven system like Android, each method call is fast enough that this isn’t a problem (you’re done handling one click by the time the next occurs). But long, drawn-out processes like network access, processing bitmaps, or accessing a database could cause other tasks to have to wait. It’s like a traffic jam!
- Tasks such as network access are blocking method calls, which stop the Thread from continuing. A blocked Main Thread will lead to the infamous “Application not responding” (ANR) error!
Thus we need to move any “slow” code (such as network access) off the Main Thread, onto a background thread, thereby allowing it to run without blocking the user interaction that occurs on the Main Thread. To do this in Android, we use a class called ASyncTask41 to perform a task (such as network access) asynchronously—without waiting for other Threads.
Learning Android Development involves knowing about what classes exist, and can be used to solve problems, but how were we able to learn about the existing of this highly useful (and specialized) ASyncTask class? We started from the official API Guide on Processes and Threads Guide42, which introduces this class! Thus to learn about new Android options, read the docs.
Note that an ASyncTask background thread will be tied to the lifecycle of the Activity: if we close the Activity, the network connection will die as well. A better option is often to use a Service, described below.
ASyncTask can be fairly complicated, but is a good candidate to practice learning from the API documentation. Looking at that documentation, the first thing you should notice (or would if the API was a little more readable) is that ASyncTask is abstract, meaning you’ll need to subclass it in order to use it. Thus you can subclass it as an inner class inside the Activity that will use it.
You should also notice that ASyncTask is a generic class with three (3) generic parameters: the type of the Parameter to the task, the type of the Progress measurement reported by the task, and the type of the task’s Result. We can fill in what types of Parameter and Result we want from our asynchronous method (e.g., take in a String and return a String[]). You can use the Void type for an unspecified type, such as with Progress measurement if you aren’t tracking that.
- We can actually pass in multiple
Stringarguments using theString... paramsspread operator syntax (representing an arbitrary number of items of that type). See here for details. The value that theASyncTaskmethods actually get is an array of the arguments.
When you “run” an AsyncTask, it will do four (4) things, represented by four methods:
onPreExecute()is called on the UI thread before it runs the task. This method can be used to perform any setup for the task.doInBackground(Params...)is called on the background thread to do the work you want to be performed asynchronously. You must override this method (it’sabstract!) The params and return type for the method need to match theASyncTaskgeneric types.onProgressUpdate()can be indirectly called on the UI thread if we want to update our progress (e.g., update a progress bar). Note that UI changes can only be made on the UI thread!onPostExecute(Result)is called on the UI thread to process any task results, which are passed as parameters to this method whendoInBackgroundis finished.
The doInBackground() is what occurs on the background thread (and is the heart of the task), so you would put e.g., network or database accessing method calls in there.
We can then instantiate a new ASyncTask object in the Activity’s onCreate() callback, and call ASyncTask#execute(params) to start the task running on its own thread.
In order to get any results back into the rendered View, you utilize the doPostExecute() method. This method is run on the UI Thread so you can use it to update the View (we can only change the View on the UI Thread, to avoid collisions). It also gets the results returned by doInBackground() passed to it automatically!
- E.g., you can take a resulting
String[]and put that into anAdapterfor aListView.
ASyncTask is the simplest, general way to do some work on a background thread. However, it has a few limitations:
The lifecycle of an
ASyncTaskis tied to that of its containing Activity. This means that if the containing Activity is destroyed (e.g., isfinished()), then the the ASyncTask is as well—you would lose any data you were downloading or might corrupt your database in some way.To handle lots of different background tasks, you would need to do your own task management.
As such, repeated or longer-lasting tasks (such as large file downloads) are often better handled through Services.
13.2 IntentServices
As mentioned above, a Service is an application component (like an Activity) that runs in the “background”, even if the user switches to another application. Services do not normally have an associated user interface, but instead are simply was to group and manage large amounts of data processing (e.g., for network downloads, media processing, or database access).
- An important thing to note about Services: a Service is not a separate process; it runs in the same process as the app that starts it (unless otherwise specified). Similarly, a Service is not a Thread, and in fact doesn’t need to run outside the UI thread! However, we quite often do want to run the service outside of the UI Thread, and so often have it spawn and run a new
RunnableThread. When we say a Service runs “in the background”, we mean from a user’s perspective rather than necessarily on a background thread.
To create a Service, we’re going to subclass Service and override some lifecycle callbacks, just like we’ve done with Activity, Fragment, BroadcastReceiver, and most other Android components. In this sense, Services are in fact implemented like Activities that run without a user interface (“in the background”).
Because Services will be performing extra background computation, it’s important to also create a separate background thread so that you don’t block the Main Thread. Since making a Service that does some (specific) task in a background thread is so common, Android includes a Service subclass we can use to do exactly this work. This class is called IntentService—a service that responds to Intents and does some work in response to them.
- An IntentService does a similar job to
ASyncTask, but with the advantage that it will keep doing that work even if the Activity is destroyed! IntentServicewill listen to any incoming “requests” (Intents) and “queue” them up, handling each one at a time. Once the service is out of tasks to do, the service will shut itself down to save memory (though it will restart if moreIntentsare sent to it). Basically, it handles a lot of the setup and cleanup involved in using a Service on its own!(This lecture will start with
IntentServicebecause it’s simpler, and then move into the more generic, complex version of Services).
We create an IntentService by defining a new class (e.g., CountingService) that subclasses IntentService.
- Implement a default constructor that can call
super(String nameForDebugging). This allows the class to be instantiated (by the Android framework; again, like an Activity). Also implement the
onHandleIntent(Intent)method. IncomingIntentswill wait their turn in line, and then each is delivered to this method in turn. Note that all this work (delivery and execution) will happen in a background thread supplied byIntentService.For example, we can have the Service (when started) log out a count, pausing for a few seconds between. This will represent “expensive” logic to perform, a la accessing a network or a database.
//java
for(int count=0; count<=10; count++){
    Log.v(TAG, "Count: "+count);
    try {
        Thread.sleep(2000); //sleep for 2 seconds
    } catch (InterruptedException e) {
        Thread.currentThread().interrupt();
    }
}
//kotlin for (count in 0..10) { Log.v(TAG, "Count: $count") try { Thread.sleep(2000) //sleep for 2 seconds } catch (e: InterruptedException) { Thread.currentThread().interrupt() } }
Just like with Activities, we also need to declare the <service> in the Manifest, as a child of the <application>:
<service android:name=".CountingService" />Finally, we can send an Intent to the Service by using the startService() method. This is similar to startActivity(), but for Services! We can use explicit intents just like with Activities, and could even include Extras if we wanted to label and track the specific Intents sent to the Service.
- When the Service starts, we can see it start counting (but without blocking the UI Thread). We can also destroy the Activity and see that the Service keeps running.
If we want to have the Service interact with the user interface (e.g., display a Toast), we will need to make sure that occurs on the UI Thread (you cannot change the UI on a separate thread). This requires inter-thread communication: we need to get a message (a function call) from the background thread to the UI Thread.
- This is what various
ASyncTaskUI thread methods (such asonProgressUpdate()) do for us.
We can perform this communication using a Handler, which is an object used to pass messages between Threads—it “handles” the messages!
We instantiate a
new Handler()object (e.g., in the Service’sonCreate()callback), calling a method on that object when we want to “send” a message. The easiest way to send a message is to use thepost()function, which takes aRunnable()method which will be executed on the Main Thread://java mHandler.post(new Runnable() { @Override public void run() { Toast.makeText(CountingService.this, "Count: " + count, Toast.LENGTH_SHORT).show(); } });//kotlin mHandler.post { Toast.makeText(this@CountingService, "Count: $count", Toast.LENGTH_SHORT).show() Log.v(TAG, "" + count) }
The Service Lifecycle
Having demonstrated the basic usage of a service, consider what is going on “under the hood”—starting with the Service lifecycle. There are actually two different “types” of Services, with different variations of the lifecycle. Started Services (or “unbound” Services) are those that are initiated via the startService() function, as in the above example. The other option, Bound Services, are Services that have “client” Activities bound to them to interact with; see below for details.
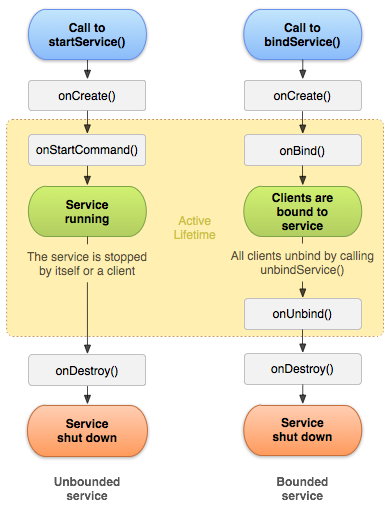
Service lifecycle diagram, from Google43
Just like with Activities, Services have an
onCreate()method that is called when the Service is first created. Since Services don’t have a user interface to set up, so we don’t often do a lot in here.- IntentService already overrides this in order to set up a “message queue” so that it can queue up Intents (tasks) to run one at a time.
The most important callback for a Started Service is called
onStartCommand(). This method is called when the Service is sent a command by another component (via an Intent). Importantly,onStartCommand()is not only called when the Service is started for the first time, but whenever the Service receives an Intent to start (even if the Service was already running)! These Intents are those sent viastartService().- Note that when working with an
IntentServicespecifically,onStartCommand()will “queue” any incoming Intents. When it is the specific Intent’s turn to be “run”, that Intent is automatically passed to theonHandleIntent()method, which executes on a background thread (similar toAsyncTask#doInBackground()). This callback is not part of the normal Service lifecycle, but is a special helper method used by IntentService—similar to howonCreateDialog()is a special method used byDialogFragments.
- Note that when working with an
The
onBind()andonUnbind()callbacks are used for bound services, and are discussed below.- IntentService does have a default
onBind()implementation that returnsnull.
- IntentService does have a default
Finally, Services have an
onDestroy()callback, which is again equivalent to the Activity callback.- In general, Services have to be manually told to stop. We stop a Service by using
stopService(Intent)to send that Service a “stop” Intent. The Service can also stop itself by callingstopSelf(). - Important: When told to stop, an
IntentServicewill finish up handling any Intents that are currently “running”, but any other Intents that are “queued” will be removed. Once there are no more queued Intents, an IntentService will callstopSelf(), thereby causing theonDestroy()callback to be executed.
- In general, Services have to be manually told to stop. We stop a Service by using
Practice: fill in the callback functions with Log or Toast messages to see how and when they are executed. For example:
//java
public int onStartCommand(Intent intent, int flags, int startId) {
  Toast.makeText(this, "Intent received", Toast.LENGTH_SHORT).show();
  return super.onStartCommand(intent, flags, startId);
}
As a last point to note about the Service lifecycle consider the int that is returned by onStartCommand(). This int is a flag that indicates how the Service should behave44 when it is “restarted” after having been destroyed:
START_NOT_STICKYindicates that if the Service is destroyed by the system, it should not be recreated. This is the “safest option” to avoid extraneous service executions; instead, just have the application restart the Service.START_STICKYindicates that if the Service is destroyed by the system, it should be recreated when possible. At that point,onStartCommand()will be called by delivering anullIntent (unless there were other start Intents waiting to be delivered, in which case those are used). This option works well for media players or similar services that are running indefinitely (rather than executing specific commands).START_REDELIVER_INTENTindicates that if the Service is destroyed by the system, it should be recreated when possible. At that point,onStartCommand()will be called with the last Intent that was delivered to the Service (and any other Intents are delivered in turn). This option is good for Services that actively perform jobs that need to be resumed, such as downloading a file.
In other words: services may get killed, but we can specify how they get resurrected! And of course, we can and should return different values for different starting commands (Intents): so the Intent to download a music file might return START_REDELIVER_INTENT, but the Intent to play the music file might return START_STICKY.
13.3 Example: A Music Service
One of the classic uses for a background service is to play music, so we will use that as an example. It is possible to play music directly from an Activity, and the music will even keep playing as long as the Activity is alive. But remember that Activities are fragile, and can be destroyed at any moment (whether by us or by the system to save resources). So in order to keep our music playing even as we go about other tasks, we should use a Service. Services have higher “priority” in the eyes of the Android system, and so don’t get sacrificed for resources as readily as normal Activities.
MediaPlayer
In order to make a music service, we need to briefly explain how to play music with MediaPlayer. This is the main API for playing sound and video (e.g., if you want to play .mp3 files).
Android actually has a total of three (3) audio APIs! The SoundPool API is great for short sound effects that play simultaneously (though you need to do extra work to load those clips ahead of time), such as for simple games. The AudioTrack API allows you to play audio at a very low level (e.g., by “pushing” bytes to a stream). This is useful for generated Audio (like MIDI music) or if you’re trying to do some other kind of low-level stuff.
MediaPlayer is very simple to use, particularly when playing a locally defined resource (e.g., something in res/raw/). You simply use a factory to make a new MediaPlayer object, and then call .play() on it:
MediaPlayer mediaPlayer = MediaPlayer.create(context, R.raw.my_sound_file);
mediaPlayer.start(); // no need to call prepare(); create() does that for you
We can also call .pause() to pause the music, .seekTo() to jump to a particular millisecond, and .stop() to stop the music.
- Note that when we
stop(), we also need to release any resources used by theMediaPlayer(to free up memory):
mediaPlayer.release();
mediaPlayer = null;
We can also implement and register a MediaPlayer.OnCompletionListener to do something when a song finishes playing.
Finally, it is possible to use MediaPlayer to play files from a ContentProvider or even off the Internet!
//java
String url = "http://........"; // your URL here
MediaPlayer mediaPlayer = new MediaPlayer();
mediaPlayer.setAudioStreamType(AudioManager.STREAM_MUSIC);
mediaPlayer.setDataSource(url);
mediaPlayer.prepareAsync(); //prepare media in the background (buffering, etc)
                            //.prepare() for synchronous buffering
mediaPlayer.setOnPreparedListener(this); //handle when file is buffered
mediaPlayer.start();
Creating a Service
In order to make our music service, we are going to subclass the Service class itself (don’t forget to include the Service in the Manifest) and manually set up all the pieces. Specifically, we will fill in the lifecycle callbacks:
onCreate()we can include, though it doesn’t need to do anything.onStartCommand()should create and start our MediaPlayer. We can returnSTART_NOT_STICKYso the music doesn’t start up again randomly if the system needs to destroy the Service (since it won’t get recreated).Important: Normally with a Service we would create a background thread to handle any extraneous work (such as preparing the music to play, as done with the
create()method). However, this may not be necessary for MediaPlayer when loading resources.onDestroy()can stop, release, and clean-up the MediaPlayer. We can implement this in a separate helper function for reuse.- If we want to handle pausing, we can specify that in the Intent we send to the service (e.g., via a custom ACTION or an Extra). But a more effective approach is to use Service Binding; see below for details.
We can now have our Activity startService() and stopService() in order to play our music in the “background”, even if we leave and return to the Activity!
13.4 Foreground Services
Services are normally “background” tasks, that run without any user interface and that the user isn’t aware of (e.g., for downloading or uploading data, etc). But music playing is definitely something that the user is aware of, and in fact may want to interact with it! So we’d like the Service to have some kind of user interface, but we’d like to still keep that Service separated from an Activity (so that it can run with the Activity being active).
To do this, we use what is called a Foreground Service. Foreground Services represent Services that are divorced from Activities (they are Services after all), but the user is aware of them—and accordingly, have an even higher survival priority if the OS gets low on memory!
Foreground services require a Notification in the status bar, similar to the Notifications we’ve created before. This Notification will effectively act as the “user interface” for the Service, and let the user see and be aware of its execution!
We create this Notification inside the Service’s onStartCommand() method, then pass it to the startForeground() method in order to put our Service in the foreground:
//java, pre-Oreo
String songName = "The Entertainer";

PendingIntent pendingIntent = PendingIntent.getActivity(getApplicationContext(), 0,
        new Intent(getApplicationContext(), MainActivity.class), PendingIntent.FLAG_UPDATE_CURRENT);

Notification notification = new NotificationCompat.Builder(this)
        .setSmallIcon(android.R.drawable.ic_media_play)
        .setContentTitle("Music Player")
        .setContentText("Now playing: "+songName)
        .setContentIntent(pendingIntent)
        .setOngoing(true) //cannot be dismissed by the user
        .build();

startForeground(NOTIFICATION_ID, notification); //make this a foreground service!
//kotlin
val songName = "The Entertainer"
val pendingIntent = PendingIntent.getActivity(applicationContext, 0,
Intent(applicationContext, MainActivity::class.java), PendingIntent.FLAG_UPDATE_CURRENT)
if (android.os.Build.VERSION.SDK_INT >= android.os.Build.VERSION_CODES.O) {
val channel = NotificationChannel(NOTIFICATION_CHANNEL_ID, "Demo channel", NotificationManager.IMPORTANCE_LOW)
val notificationManager = getSystemService(Context.NOTIFICATION_SERVICE) as NotificationManager
notificationManager.createNotificationChannel(channel)
}
val notification = NotificationCompat.Builder(this, NOTIFICATION_CHANNEL_ID)
.setSmallIcon(android.R.drawable.ic_media_play)
.setContentTitle("Music Player")
.setContentText("Now playing: $songName")
.setContentIntent(pendingIntent)
.setOngoing(true) //cannot be dismissed by the user
.build()
startForeground(NOTIFICATION_ID, notification) //make this a foreground service!Some details about this Notification:
- We build and set the icon, title, and text as in the previous lecture.
- We give the Notification a
PendingIntentto run when selected. This PendingIntent can just open up ourMainActivity, allowing us to control the Player. (Alternatively, we could use Notification Actions to control the music directly). - We set the Notification to be ongoing, in order to enforce that it cannot be dismissed by the user.
Importantly, once we are done doing foreground work (e.g., playing music), we should call stopForeground(true) to get rid of the foreground service. This is a good thing to do in our stopMusic() helper (called from onDestroy()).
There are a couple of other details that you should handle if you’re making a full-blown music player app, including: keeping the phone from going to sleep, playing other audio at the same time (e.g., notification sounds; ringtones), switching to external speakers, etc. See the guide for more details.
13.5 Bound Services
As mentioned above, there are two “types” of Services: Started Services (Services launched with startService()) and Bound Services. A Bound Service is a Service that acts as the “server” in a client-server setup: it allows for client Activities to “connect” to it (bind it) and then exchange messages with it—primarily by calling methods on the Service. These messages can even be across processes, allowing for interprocess communication! This is useful when you want interact with the Service from an Activity in some way (e.g., if we want to pause() our music), or if we want to make the service’s capabilities available to other applications.
We make a Bound Service by having the Service implement and utilize the onBind() callback. This method returns an IBinder object (the I indicates that it’s an Interface, following a Java convention common in enterprise software). When Activities connect to this Service (using the bindService() method), this IBinder object is passed to them, and they can use it to get access to the Service process to call methods on it. Effectively, the binding process produces an object that represents that Service, so Activities can call methods on the Service without needing to send it Intents!
As an example, let’s add the ability to “pause” the music being played as a bound service:
The first thing we need to do is have our Service implement the onBind() method. To do this, we will need an IBinder object to return (that is: an object of a class that implements the IBinder interface). For “local services” (e.g., Services that are run in the same process), the easiest way to get an IBinder is to extend the Binder class:
//kotlin
public class MyBinder extends Binder { //implements IBinder
    //binder class methods will go here!
}

private final IBinder mBinder = new MyBinder(); //singleton instance variable
//kotlin
class LocalBinder : Binder() {
//binder class methods will go here!
}
private val mLocalBinder = LocalBinder() //singleton instance variable- Our local version starts “empty” for now; we’ll add details below.
- We will just return this object from
onBind().
Because the Activity is given a copy of this MyBinder object, that class can be designed to support the Activity communicating with the Service in a couple of different ways:
The
IBindercan providepublicmethods for the Activity to call. These methods can then access instance variables of the Service (since theMyBinderis a nested class). This causes theIBinderto literally act as the “public interface” for the Service!//in MyBinder public String getSongName() { return songName; //access Service instance variable }The
IBindercan provide access to the Service itself (via a getter that returns theServiceobject). The Activity can then call any public methods provided by thatServiceclass.//in MyBinder public MusicService getService() { // Return this instance of this Service so clients can call public methods on it! return MusicService.this; }The
IBindercan provide access to some other object “owned” by the Service, which the Activity can then call methods on (e.g., theMediaPlayer). This is somewhat like a compromise between the first two options: you don’t need to implement a specific public interface on theIBinder, but you also don’t have to provide full access to your Service object! This is good for only exposing part of the Service.
In the Activity, we need to do a bit more work in order to interact with the bound Service. We bind to a Service using bindService(Intent, ServiceConnection, flag). We can do this whenever we want the Service to be available (onStart() is a good option, so it is available when the Activity is active).
- The Intent parameter should be addressed to the Service we want to bind.
The
ServiceConnectionparameter is a reference to an object that implements theServiceConnectioninterface, providing callbacks that can be executed when the Activity connects to the Service. We can have the Activity implement the interface, or create a separate anonymous class://java /** Defines callbacks for service binding, passed to bindService() */ /** From Android documentation */ private ServiceConnection mConnection = new ServiceConnection() { public void onServiceConnected(ComponentName className, IBinder service) { // We've bound to LocalService, cast the IBinder and get LocalService instance MyBinder binder = (MyBinder) service; mService = binder.getService(); mBound = true; } public void onServiceDisconnected(ComponentName arg0) { mBound = false; } };//kotlin /** Defines callbacks for service binding, passed to bindService() */ /** From Android documentation */ private val mConnection = object : ServiceConnection { override fun onServiceConnected(className: ComponentName, service: IBinder) { // We've bound to LocalService, cast the IBinder and get LocalService instance val binder = service as LocalService.LocalBinder mService = binder.getService() mBound = true } override fun onServiceDisconnected(arg0: ComponentName) { mBound = false } }The
onServiceConnected()callback handles the actual connection, and is where we get access to thatIBinder. We can use thatIBinderto fetch the Service object to call methods on, saving that as an instance variable to do stuff to it! We’ll also track whether or not the Service has been bound to avoid anynullerrors.Finally, the
flagparameter indicates some options for how the Service should be bound (e.g., for specifying survival priority).Conetxt.BIND_AUTO_CREATEis a good default, specifying that the binding should create the Service object if needed.
Once a Service is bound, we can call methods on that Service (which must exist!)—allowing us to support the “pause” button.
We should also call unbindService() when the Activity stops, in order to free up resources:
protected void onStop() {
    if (mBound) {
        unbindService(this);
    }
    super.onStop();
}
Keep in mind that binding a Service DOES NOT call onStartCommand(), but simply creates the Service and gives us access to it! Bound Services are not by default considered “started”, and are generally kept around by the OS as long as they are bound. If we do “start” a Bound Service (e.g., with startService()), we will need to remember to stop it later!
This example is just for local services (that are accessed within the same process—within the same Application). If we want the Service to be available to other processes (i.e., other Applications), we need to do more work. Specifically, we use Handler and Messenger objects to pass messages between these processes (similar to the example we did for passing messages between threads); for more details, see the example in the guide, as well as the complete sample classes MessengerService and MessengerServiceActivities.