Lecture 6 Fragments
This lecture discusses Android Fragments. A Fragment is “a behavior or a portion of user interface in Activity.” You can think of them as “mini-activities” or “sub-activities”. Fragments are designed to be reusable and composable, so you can mix and match them within a single screen of a user interface. While XML resource provide reusable and composable views, Fragments provide reusable and composable controllers. Fragments allow us to make re-usable pieces of Activities that can have their own layouts, data models, event callbacks, etc.
This lecture references code found at https://github.com/info448/lecture06-fragments.
Fragments were introduced in API 11 (Honeycomb), which provided the first “tablet” version of Android. Fragments were designed to provide a UI component that would allow for side-by-side activity displays appropriate to larger screens:
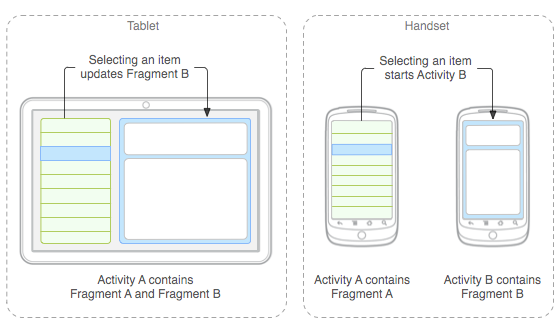
Fragment example, from Google17.
Instead of needing to navigate between two related views (particularly for this “master and detail” setup), the user can see both views within the same Activity… but those “views” could also be easily split between two Activities for smaller screens, because their required controller logic has been isolated into a Fragment.
Fragments are intended to be modular, reusable components. They should not depend on the Activity they are inside, so that you can be flexible about when and where they are displayed!
Although Fragments are like “mini-Activities”, they are always embedded inside an Activity; they cannot exist independently. While it’s possible to have Fragments that are not visible or that don’t have a UI, they still are part of an Activity. Because of this, a Fragment’s lifecycle is directly tied to its containing Activity’s lifecycle. (e.g., if the Activity is paused, the Fragment is too. If the Activity is destroyed, the Fragment is too). However, Fragments also have their own lifecycle with corresponding lifecycle callbacks functions.
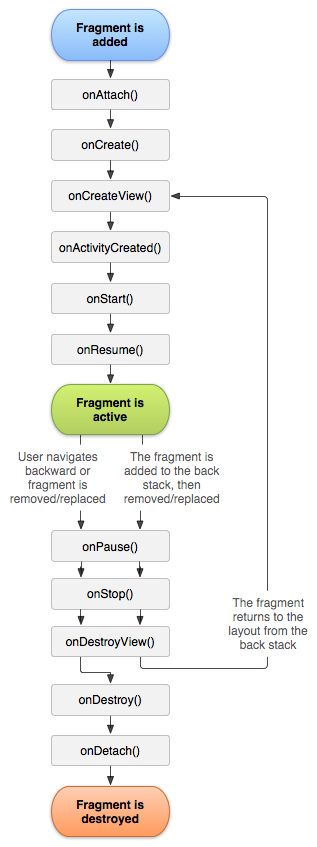
Fragment lifecycle state diagram,
from Google18.
The Fragment lifecycle is very similar to the Activity lifecycle, with a couple of additional steps:
onAttach(): called when the Fragment is first associated with (“added to”) an Activity, and thus gains a Context. This callback is generally used for initializing communication between the Fragment and its Activity.This callback is mirrored by
onDetach(), for when the Fragment is removed from an Activity.onCreateView(): called when the View (the user interface) is about to be drawn. This callback is used to establish any details dependent on the View (including adding event listeners, etc).Note that code initializing data models, or anything that needs to be persisted across configuration changes, should instead be done in the
onCreate()callback.onCreate()is not called if the fragment is retained (see below).This callback is mirrored by
onDestroyView(), for when the Fragment’s UI View hierarchy is being removed from the screen.onActivityCreated(): called when the containing Activity’sonCreate()method has returned, and thus indicates that the Activity is fully created. This is useful for retained Fragments.This callback has no mirror!
6.1 Creating a Fragment
In order to illustrate how to make a Fragment, we will refactor the MainActivity to use Fragments for displaying a list of movies. This will help to illustrate the relationship between Activities and Fragments.
To create a Fragment, you subclass the Fragment class. Let’s make one called MovieListFragment (in a MovieListFragment.java file). You can use Android Studio to do this work: via the File > New > Fragment > Fragment (blank) menu option. (DO NOT select any of the other options for in the wizard for now; they provide template code that can distract from the core principles).
There are two versions of the Fragment class: one in the framework’s android.app package and one in the android.support.v4 package. The later package refers to the Support Library. As discussed in the previous chapter, these are libraries of classes designed to make Android applications backwards compatible: for example, Fragment and its related classes came out in API 11 so aren’t in the android.app package for earlier devices. By including the support library, we can include those classes on older devices as well!
Support libraries also include additional convenience and helper classes that are not part of the core Android package. These include interface elements (e.g.,
ConstraintLayout,RecyclerView, orViewPager) and accessibility classes. See the features list for details. Thus it is often useful to include and utilize support library versions of classes even when targeting later devices so that you don’t need to “roll your own” versions of these convenience classes.The main disadvantage to using support libraries is that they need to be included in your application, so will make the final
.apkfile larger (and may potentially require workarounds for method count limitations). You will also run into problems if you try and mix and match versions of the classes (e.g., from different versions of the support library). But as always, you should avoid premature optimization. Thus in this course you should default to using the support library version of a class when given a choice!Note that the
androidxpackage that is being developed as part of Jetpack will likely be replacing support libraries.
After we’ve created the MovieListFragment.java file, we’ll want to specify a layout for that Fragment (so it can be shown on the screen). As part of using the New Fragment Wizard we were provided with a fragment_movie_list layout that we can use.
- Since we want the Movie list to live in that Fragment, we can move (copy) the View definitions from
activity_mainintofragment_movie_list. - We will then adjust
activity_mainso that it instead contains an emptyFrameLayout. This will act as a simple “container” for our Fragment (similar to an empty<div>in HTML). Be sure to give it anidso we can refer to it later!.
It is possible to include the Fragment directly through the XML, using the XML to instantiate the Fragment (the same way that we have the XML instantiate Buttons). We do this by specifying a <fragment> element, with an android:name attribute assigned a reference to the Fragment class:
<fragment
   android:id="@+id/fragment"
     android:name="edu.uw.fragmentdemo.MovieListFragment"
     android:layout_width="match_parent"
     android:layout_height="match_parent"/>
Defining the Fragment in the XML works (and will be fine to start with), but in practice it is much more common and worthwhile to instantiate the Fragments dynamically at runtime in the Java/Kotlin code—thereby allowing the Fragments to be dynamically determined and changed. We will start with the XML version to build the Fragment initially, and then shift to the Kotlin version to talk about changing Fragments.
We can next begin filling in the Kotlin logic for the Fragment. Android Studio provides a little starter code: the onCreateView() callback, which is what we will use that to set up the layout (similar to what we do with the onCreate() method of MainActivity). But the MainActivity#onCreate() method specifies a layout by calling setContentView() and passing a resource id. With Fragments, we can’t just “set” the View because the Fragment belongs to an Activity, and so will exist inside of that Activity’s View hierarchy! Instead, we need to figure out which ViewGroup the Fragment is inside of, and then inflate the Fragment’s View inside that ViewGroup.
This “inflated” View is referred to as the root view: it is the “root” of the Fragment’s View tree (the View that all the Views inside the Fragment’s layout will be attached to). We access the root view by inflating the fragment’s layout, and saving a reference to the inflated View:
//java
View rootView = inflater.inflate(R.layout.fragment_layout, container, false);
//kotlin
val rootView = inflater.inflate(R.layout.fragment_layout, container, false)- Note that the
inflaterobject we are callinginflate()on was passed as a parameter to theonCreateView()callback. The parameters to theinflate()method are: the layout to inflate, theViewGroup(container) into which the layout should be inflated (also passed as a parameter to the callback), and whether or not to “attach” the inflated layout to the container (falsein this case because the Fragment system already handles the attachment, so the inflate method doesn’t need to). TheonCreateView()callback mustreturnthe inflated root view, so that the system can perform this attachment.
With the Fragment’s layout defined, we can start moving functionality from the Activity into the Fragment.
The
ListViewandadaptersetup will need to be moved over. The UI setup (including initializing the Adapter) will be moved from the Activity’sonCreate()to the Fragment’sonCreateView(). However, you will need to make a few changes during this refactoring:The
findViewById()method is a method of theActivityclass, and thus can’t be called on an implicitthisinside the Fragment. Instead, the method can be called on the root view, searching just that View and its children.The Adapter’s constructor requires a
Contextas its first parameter; while anActivityis aContext, aFragmentis not—Fragments operate in the Context of their containing Activity! Fragments can refer to the Activity that they are inside (and theContextit represents) by using thegetActivity()method (or just theactivityproperty in Kotlin). Note that this method should be used only for getting a reference to aContext, not for arbitrary communication with the Activity (see below for details).In Kotlin, because syntactically the
Activityis allowed to benull(even though that would never happen), we either have to explicitly note that the Activity is not null with!!activity. Or more idiomatically, we can wrap the Activity-required functionality in a.let()lambda://kotlin //if Activity is not null, perform the following on `it` activity?.let { //do stuff on Activity adapter = adapter = ArrayAdapter(it, R.layout.list_item, R.id.txt_item, ArrayList()) }
The
downloadMovieData()helper method can be moved over, so that it belongs to the Fragment instead of the Activity. It will be the Fragment’s responsibility to handle data downloading.
Activity-to-Fragment Communication
This example has intentionally left the input controls (the search field and button) in the Activity, rather than making them part of the Fragment. Apart from being a useful demonstration, this allows the Fragment to have a single purpose (showing the list of movies) and would let us change the search UI independent of the displayed results. But since the the button is in the Activity while the downloading functionality is in the Fragment, we need a way for the Activity to “talk” to the Fragment. We thus need a reference to the contained Fragment—access to the XML similar to that provided by findViewById.
We can get a reference to a contained Fragment from an Activity by using a FragmentManager. This is an object responsible for (ahem) managing Fragments. It allows us to “look up” Fragments, as well as to manipulate which Fragments are shown. We access this FragmentManager by calling the getSupportFragmentManager() method (or using the supportFragmentManager property in Kotlin) of the Activity, and then can use findFragmentById() to look up an XML-defined Fragment by its id:
//java
//MovieListFragment example
MovieListFragment fragment = (MovieListFragment)getSupportFragmentManager().findFragmentById(R.id.fragment);
//kotlin
val fragment: MovieListFragment = supportFragmentManager.findFragmentById(R.id.fragment) as MovieListFragment- Note that we’re using a method to explicit access the support
FragmentManager. The Activity class (API level 15+) is able to work with both the platform and supportFragmentManagerclasses. But because these classes don’t have a sharedinterface, the Activity needs to provide different Java/Kotlin methods which can return the correct type.
Once you have a reference to the Fragment, this acts just like any other object—you can call any public methods it has! For example, if you give the Fragment a public method (e.g., searchMovies()), then this method can be called from the Activity:
//called from Activity on the referenced fragment
fragment.searchMovies(searchTerm)
(The parameter to this public method allows the Activity to provide information to the Fragment!)
At this point, the program should be able to be executed… and continue to function in exactly the same way! The program has just been refactored, so that all the movie downloading and listing work is encapsulated inside a Fragment that can be used in different Activities.
- In effect, we’ve created our own “widget” that can be included in any other screen, such as if we repeatedly wanted the list of movies to be available alongside some other user interface components.
6.2 Dynamic Fragments
The real benefit from encapsulating behavior in a Fragment is to be able to support multiple Fragments within a single Activity. For example, in the the archetypal “master/detail” navigation flow, one screen (Fragment) holds the “master list” and another screen (Fragment) holds details about a particular item. This is a very common navigation pattern for Android apps, and can be seen in most email or news apps.
- On large screens, Fragments allow these two Views to be placed side by side!
In this section, we will continue to refine the Movie app so that when the user clicks on a Movie in the list, the app shows a screen (Fragment) with details about the selected movie.
Instantiating Fragments
To do this, we will need to instantiate the desired Fragment dynamically (in Java code), rather than statically in the XML using the <fragment> element. This is because we need to be able to dynamically change which Fragment is currently being shown, which is not possibly for Fragments that are “hard-coded” in the XML.
Unlike Activities, Fragments (such as MovieListFragment) do have constructor methods that can be called. In fact, Android requires that every Fragment have a default (no-argument) primary constructor that is called when Fragments are created by the system! While we have access to the constructor, it is considered best practice to not call this constructor directly from the Activity when you want to instantiate a Fragment, and to in fact leave the method empty. This is because we do not have full control over when the constructor is executed: the Android system may call the no-argument constructor whenever it needs to recreate the Activity (or just the Fragment), which can happen at arbitrary times. Since only this default constructor is called, we can’t add an additional constructor with any arguments we may want the Fragment to have (e.g., the searchTerm)… and thus it’s best to not use it at all.
Instead, we specify a simple factory method (by convention called newInstance()) which is able to “create” an instance of the Fragment for us. This factory method can take as many arguments as we want, and then does the work of passing these arguments into the Fragment instantiated with the default constructor. Note that this factory needs to be a static method (it is called on the class, not the object), and so is defined in a companion object in Kotlin.
//java
public static MyFragment newInstance(String argument) {
    MyFragment fragment = new MyFragment(); //instantiate the Fragment
    Bundle args = new Bundle(); //an (empty) Bundle for the arguments
    args.putString(ARG_PARAM_KEY, argument); //add the argument to the Bundle
    fragment.setArguments(args); //add the Bundle to the Fragment
    return fragment; //return the Fragment
}
//kotlin
companion object {
private val ARG_PARAM_KEY = "my key"
fun newInstance(argument: String): MyFragment {
val args = Bundle().apply {
putString(ARG_PARAM_KEY, argument)
}
val fragment = MyFragment().apply {
setArguments(args)
}
return fragment
}
}In order to pass the arguments into the new Fragment, we wrap them up in a Bundle (an object containing basic key-value pairs). Values can be added to a Bundle using an appropriate putType() method; note that these do need to be primitive types (int, String, etc.). The Bundle of arguments can then be assignment to the Fragment by calling the setArguments() method.
In Kotlin, it’s idiomatic to do this work using the
apply()method described in the previous chapter. This lets you easily put lots of values in the Bundle without needing to write the wordargsover and over again.We will be able to access this
Bundlefrom inside the Fragment (e.g., in theonCreateView()callback) by using thegetArguments()method, and thegetTYPE()methods to retrieve the values from it; in Kotlin you can access these as properties. This allows us to dynamically adjust the content of the Fragment’s Views! For example, we can run thedownloadMovieData()function using this argument, fetching movie results as soon as the Fragment is created (e.g., on a button press)… allowing thedownloadMovieData()function to again be made private, for example.Since the
Bundleis a set of key-value pairs, each value needs to have a particular key. These keys are usually defined asprivateconstants (e.g.,ARG_PARAM_KEYin the above example) to make storage and retrieval easier. Remember: hese Bundles are internal to the Fragment!
We will then be able to instantiate the Fragment (e.g., in the Activity class), passing it any arguments we wish:
//java
MyFragment fragment = MyFragment.newInstance("My Argument");
//kotlin
val fragment = MyFragment.newInstance("My Argument")Transactions
Once we’ve instantiated a Fragment in the Java, we need to attach it to the view hierarchy: since we’re no longer using the XML <fragment> element, we need some other way to load the Fragment into the <FrameLayout> container.
We do this loading using a FragmentTransaction19. A transaction represents a change in the Fragment that is being displayed. You can think of this like a bank (or database) transaction: they allow you to add or remove Fragments like we would add or remove money from a bank account. We instantiate new transactions representing the change we wish to make, and then “run” that transaction in order to apply the change.
To create a transaction, we utilize the FragmentManager again; the FragmentManager#beginTransaction() method is used to instantiate a new FragmentTransaction.
Transactions represent a set of Fragment changes that are all “applied” at the same time (similar to depositing and withdrawing money from multiple bank accounts all at once). We specify these transactions using by calling the add(), remove(), or replace() methods on the FragmentTransaction.
The
add()method lets you specify which View container you want to add a particular Fragment to. Theremove()method lets you remove a Fragment you have a reference to. Thereplace()method removes any Fragments in the container and then adds the specified Fragment instead.Each of these methods returns the modified
FragmentTransaction, so they can be “chained” together. In Kotlin, you can also use therun()method to perform this a block—similar toapply(), but it doesn’t return the object in the end.
Finally, we call the commit() method on the transaction in order to “submit” it and have all of the changes go into effect.
We can do this work in the Activity’s search click handler to add a Fragment, rather than specifying the Fragment in the XML:
//java
FragmentTransaction transaction = getSupportFragmentManager().beginTransaction();
//params: container to add to, Fragment to add, (optional) tag
transaction.add(R.id.container, myFragment, MOVIE_LIST_FRAGMENT_TAG);
transaction.commit();
//kotlin
supportFragmentManager.beginTransaction().run {
add(R.id.container, myFragment, MOVIE_LIST_FRAGMENT_TAG)
commit()
}- The third argument for the
add()method is a “tag” we apply to the Fragment being added. This gives it a “name” that we can use to find a reference to this Fragment later if we want (viaFragmentManager#findFragmentByTag(tag)). Alternatively, we can save a reference to the Fragment as an instance variable; this is faster but more memory intensive (and can cause possible leaks, since the reference keeps the Fragment from being reclaimed by the system).
Inter-Fragment Communication
We can use this transaction-based structure to instantiate and load a second Fragment (e.g., a “detail” view for a selected Movie). We can add functionality (e.g., in the onClick() handler) so that when the user clicks on a movie in the list, we replace() the currently displayed Fragment with this new details Fragment.
However, remember that Fragments are supposed to be modular—each Fragment should be self-contained, and not know about any other Fragments that may exist (after all, what if we wanted the master/detail views to be side-by-side on a large screen, instead of the list replacing itself?)
Using getActivity() to reference the Activity and getSupportFragmentManager() to access the manager is a violation of the Law of Demeter—don’t do it!
Instead, we have Fragments communicate by passing messages through their contained Activity: the MovieFragment should tell its Activity that a particular movie has been selected, and then that Activity can determine what to do about it (e.g., creating a DetailFragment to display that information).
The recommended way to provide Fragment-to-Activity communication is to define an interface. The Fragment class should specify an interface (for one or more public methods) that its containing Activity must support—and since the Fragment can only exist within an Activity that implements that interface, it knows the Activity has the specified public methods that it can call to pass information to that Activity.
As an example of this process:
Create a new
interfaceinside the Fragment (e.g.,OnMovieSelectedListener). This interface needs a public method (e.g.,onMovieSelected(Movie movie)) that the Fragment can call to give instructions or messages to the Activity.In the Fragment’s
onAttach()callback (called when the Fragment is first associated with an Activity), we can check that the Activity actually implements the interface by trying to cast it to that interface. We can also save a reference to this Activity for later, to save some time://java public void onAttach(Context context) { super.onAttach(context); try { callback = (OnMovieSelectedListener)context; //attempt to cast } catch (ClassCastException e) { throw new ClassCastException(context.toString() + " must implement OnMovieSelectedListener"); } }//kotlin override fun onAttach(context: Context?) { super.onAttach(context) callback = context as? OnMovieSelectedListener if(callback == null){ throw ClassCastException("$context must implement OnMovieSelectedListener") } }Then when an action occurs in the Fragment (e.g., a movie is selected), you call the interface’s method on the
callbackreference.Finally, you will need to make sure that the Activity
implementsthis callback. Remember that a class can implement multiple interfaces!In the Activity’s implementation of the interface, you can handle the information provided. For example, use the
FragmentManagerto create areplace()transaction to load a newDetailFragmentfor the appropriate data.
In the end, this will allow you to have one Fragment cause the application to switch to another!
This is not the only way for Fragments to communicate. It is also possible to have a Fragment send an Intent to the Activity, who then responds to that as appropriate. But using the Intent system is more resource-intensive than using interfaces.
Parcelable
It’s not uncommon to want to pass multiple or complex data values as arguments to a new Fragment, such as a Movie object. However, the arguments for a new Fragment must be passed in through a Bundle, which are only able to store primitive values (e.g., int, float, String)… and a special data type called Parcelable. An object that implements the Parcelable interface includes methods that allow it to be serialized into a value that is simple enough to place in a Bundle—in effect, it’s values are converted into a formatted String (similar in concept to JSON.stringify() in JavaScript).
Implementing the Parcelable interface involves the following steps: 1. provide a writeToParcel() method that adds the object’s fields to a given Parcel object 2. provide a constructor that can re-create the object from a Parcel by reading the values from it (in the EXACT SAME order they were added!) 3. provide a describeContents() that returns whether the parcel includes a file descriptor (usually 0, meaning not) 4. provide a Parcelable.Creator constant that can be used to create the Parcelable.
These steps seem complex but are fairly rote: as such, it’s possible to “automate” making a class into a Parcelable. My favorite strategy for Java is to use http://www.parcelabler.com/, a website that allows you to copy and paste a class and provides you a version of that class with the Parcelable interface implemented!
In Kotlin it’s even easier: if you include the Kotlin Android Extensions, you can activate experimental mode by adding a declaration to your app’s build.gradle file. Once that has been included, you can simply annotate the class with the @Parcelize annotation, and the clas will automatically be provided with the methods to implement the Parcelable interface.
Bundles are only supposed to store small amounts of information (a few variables); and by extension Parcelable objects should also only include a few attributes. Never make an object that contains an array or a list into a Parcelable! Complex or variable-length data should instead be persisted separate from the Activity (e.g., in a database), with identifiers passed in Bundles instead.
The Back Stack
But what happens when we hit the “back” button? The Activity exits! Why? Because “back” normally says to “leave the Activity”—we only had one Activity, even though there were multiple fragments.
Recall that the Android system may have lots of Activities (even across multiple apps!) with the user moving back and forth between them. As described in Lecture 3, each new Activity is associated with a “task” and placed on a stack20. When the “back” button is pressed, that Activity is popped off the stack, and the user is taken to the Activity that is now at the top.
Fragments by default are not part of this “back-stack”, since they are just components of Activities. However, you can specify that a transaction should include the Fragment change as part of the stack navigation by calling FragmentTransaction#addToBackStack() as part of your transaction (e.g., right before you commit()):
//java
getSupportFragmentManager().beginTransaction()
                           .add(detailFragment, "detail")
                           // Add this transaction to the back stack
                           .addToBackStack(null)
                           .commit();
Note that the “back” button will cause the entire transaction to “reverse”. Thus if you performed a remove() then an add() (e.g., via a replace()), then hitting “back” will cause the the previously added Fragment to be removed and the previously removed Fragment to be added.
FragmentManageralso includes numerous methods for manually manipulating the back-stack (e.g., “popping” off transactions) if you want to include custom navigation elements such as extra “back” buttons.